Well, the search will return more than a few photos which when viewed you feel like you have just partaken of some kind of mind altering substance.
To be honest aesthetically not really my cup of tea.....
To be clear High Dynamic Range photography is combining photographs of differing exposure to give a result rendering a greater range of tonal detail than the camera can capture in one photo
In just about all of my work I use HDR.
It may not be instantly apparent but I do
My definition of good post production is that one cannot tell it has happened
Here is a good example of how I use HDR
This image was shot as part of 'The Bridge of Doom' series over 3 days in North Wales, in January.
The fashion shoot had a 'spy thriller' theme.
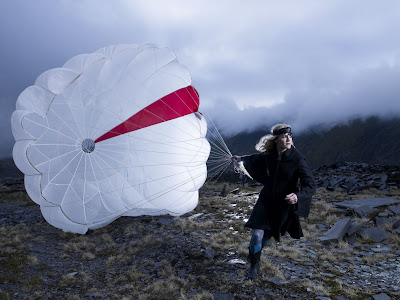
'Agent Laura' parachutes into a forbidden zone to recover a secret map, dodging guards as she escapes.
The original (and rather uninspiring!) idea I came up with was for her to be burying the parachute upon landing
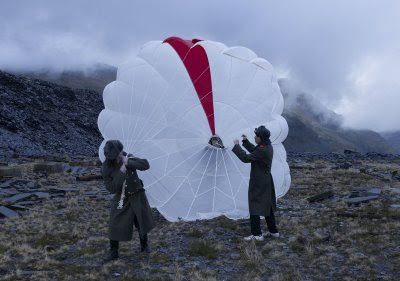
When we were up on the mountain though we were blessed with a breezy day, and we started to fool around with the parachute in the wind

Watching the crew at play made me realize that this could make a great shot
With a little coaching Laura was soon running with the parachute and we were running alongside her shooting as we ran with the 'Lighting team' running just to my right with the Elinchrom Ranger with a Medium Chimera soft box (front screen removed but inner baffle still in place to give a slightly harder more contrasty look with half a stop more power)
The tricky part was shooting just at the right moment when she was in front of the back light, another Elinchrom Ranger but with a grid spot.(we do clone the stand out in the finished pic)
Running on the slate was quite hard, we all fell over at some point.
We did about 20 'runs' before we were exhausted
We got one frame
But my friends all you need is one frame if its a 'killer'
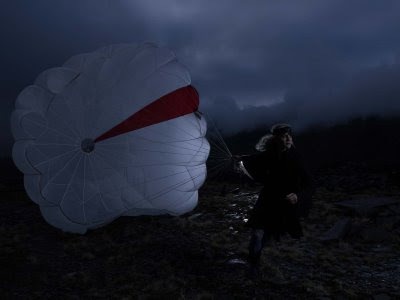
Here it is straight out of the camera....

Shot on a Phase One P30, 250th sec at F8
Pretty good as it is but missing some detail in key areas, notably the jacket which is made from just about the most extremely non reflective fabric known to mankind
The parachute too is just a 'shade to 'hot' for my liking
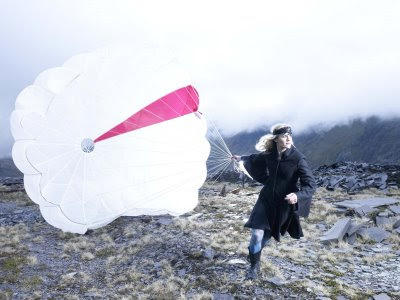
So, I processed the image a second time, in Capture One, this time at + 2.5 stops
1. create a new layer on the light image
2. select 'all' on the dark layerthen copy and paste the dark layer onto the light layer
3. copy and paste the dark layer onto the light layer
4. select the eraser tool from the tool bar and carefully selecting a suitable opacity 'rubbing through' to the background layer to achieve the desired effect
I then processed the image a 3rd time this time at minus approx 2 stops in Capture One and repeated the process to get the tones exactly as I wanted them in areas like the sky and parachute

To some photoshop wizards out there this may seem a long winded way to go about it, but it works for me.
I understand too that with the amazing shadow/highlight recovery too in Capture One 4 I could go a long way without layering, but this gives me an amazing degree of control and the look I want.
Here is the finished result.


16 comments:
Hi Drew,
I saw this series in your web site a few months ago and I really like it, this is really inspiring. Has it been published or a commissioned work or was it only a personal assignment ?
I share your thoughts about HDR out there on the web, not really my taste ...
by the way I use it most the time the same way as you are, though I suppose it's more flexible to work from the larger dynamic range of an MF back file than from a DSLR.
Cheers Fred
Sounds very similar to the process I apply to almost all of my images. The difference is that I pull the + & - exposures on top of the original, then make them invisible except the original. Go to channels and cmnd-click in the rgb. This will make a highlightbased selection. Back to layers, make the darker exposure visible (selection still active) and apply a mask to it (rendering the selection to a b&w image in the mask). Now you got all the hot areas of the original covered by the darker layer.
Repeat the whole thing with the brighter exposure and invert the resulting mask, which will only bring up the shadows of the original.
you will need additional processing from here on, but you have a true and "semi-automated" HDR-process going.
painting in the masks will do the same as the eraser tool, but with even more control...
Cheers - Nicolas Henri
http://nicolashenri.ch
Thank you for your comments.
I lie to share my experiences of course, but I figured i would get a lot of feedback about this post which would help me raise my game too!
Many of my techniques are, as I have said, low tech and more than a little archaic.
Hi Drew,
I think you've hit the nail on the head regarding the techniques you, presonally, employ. At the end of the day, if you're getting the results you want (and, of course, this impresses your clients), then why change the way you work?
So much is made nowadays about technology and the 'latest/best/new & improved' equipment - but this can only take you so far, can't it? Sounds like you are a traditionalist at heart, much like myself!
Cheers.
Thank you Giles
I love technology but often I do tend to come at it from a film based background.Applying 'darkroom techniques' in post production.
Cheers
Drew
Hi Drew, beautiful result! very clear explenation and way of thinking
Happy to read your blog
Cheers Vincent
www.holandaluz.com
holandaluz.blogspot.com
I have the same approach in my retouching, I also come from a film background and think in terms of what I would have done in a darkroom hand print. Whatever technique if you get the result you want then its worked. Most important thing is the end result, which with your work is stunning, I love the forest series, when are you going to do a book? I would happily part with my hard earned cash.
I use the same technique as Nicolas Henri. But I always do this with the GIMP (sadly it doesn't eat 16-bit). The reason I like the GIMP for it is because you can then apply curves or levels to the MASKs, so you can make the different zones more or less opaque and see the difference as you change the graph. Masking with the brush is hard when you want a realistic result, this method gives you soft transitions where more often than not both layers are partially visible on any random location.
If someone knows how to apply curves to masks in Photoshop, I'd be much obliged to hear.
WOW, that image is amazing. Thanks for taking the time to explain and show...
A
Drew-
Thanks for sharing. I work pretty similarly to you as well.
A note:
Instead of selecting all and then copy / paste, just SHIFT+DRAG each of the exposures into your main image, and they'll be automatically centered. Save you a couple keystrokes.
@Harm... not sure if this will help...
Using any of the last three versions of photoshop, if you have a layer that's masked, you can apply adjustment layers (levels, curves, etc.), hit ctrl+alt+g (command+opt+g on mac) and it will only apply it to the masked layer.
benderienzo.com
Just a thought (and i agree with the person above who says if it works for you no need to change) but I used to do things this way too and i find it much faster now to use Lightroom's recovery and highlight tools.
With Lightroom 2 you can dodge and burn with masks too for additional levels of light control.
Nice photo either way.
Hi Andy
Thank you for your kind comments
Lightroom along with Capture One 4 and others, have the Highlight and shadow recovery tools.
I do use them but to be honest I find they only take me so far.
I find they are brilliant for fast 'out of the box' results on commercial shoots where I need a quick solution.
When it comes to my 'own' work however I find that they do not take me far enough in terms of effect, and I revert to my old darkroom habits
Cheers
Drew
Great blog! Detailed and with a wealth of information.
Regarding the post "HDR- My way", I don't quite get the comment that you wanted more detail in the jacket. I've compared the original image to the final result up close and it seems that the jacket contains more detail in the original than it does in the final result. It's not that the final result isn't cool, I just wondered about this "oddity" :)
Thanks again!
Hey Jonas
I dunno, maybe its the monitor?
Cheers
Drew
This is more like JoeyL style of editing. Nice!
www.junphotography.multiply.com
jun_madayag2004@hotmail.com
Thanks!
I'm told by David Hobby that Joey L is a good bloke as well as a top photographer
Cheers
drew
Post a Comment